图例
使用图例文件的 G 记录将接下来的图例条目上移 N 行,N 为符号图例条目的数目
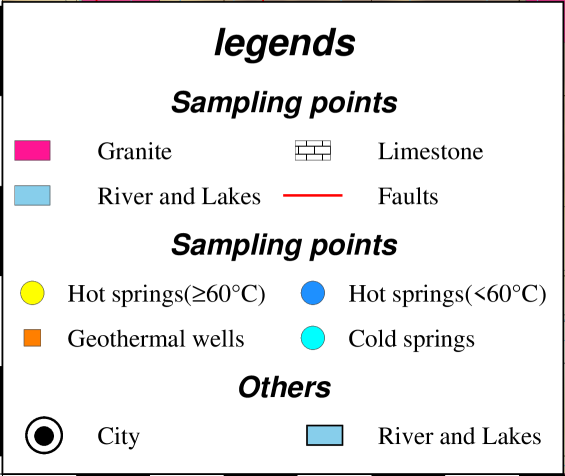
图例的一些绘图示例
 1
 2
 3
 4
 5
 6
 7
 8
 9
10
11
12
13
14
15
16
17
18
19
20
21
22
| >REM Plot sampling point legend
echo H 18p,3 legends > sampling_points.dat
echo H 14p,3 Sampling points >> sampling_points.dat
echo N 2 >> sampling_points.dat
echo S 0.4c r 0.6 255/20/147 0.1p,gray31 1.5c Granite >> sampling_points.dat
echo S 0.4c r 0.6 p20 0.1p,gray31 1.5c Limestone >> sampling_points.dat
echo S 0.4c r 0.6 skyblue 0.1p,gray31 1.5c River and Lakes >> sampling_points.dat
echo S 0.4c - 1 red 1p,red 1.5c Faults >> sampling_points.dat
echo H 14p,3 Sampling points >> sampling_points.dat
echo N 2 >> sampling_points.dat
echo S 0.4c c 0.4 255/255/0 0.1p,gray31 1c Hot springs(@~\263@~60@.C) >> sampling_points.dat
echo S 0.4c c 0.4 30/144/255 0.1p,gray31 1c Hot springs(\07460@.C) >> sampling_points.dat
echo S 0.4c s 0.4 255/127/0 0.1p,gray31 1c Geothermal wells >> sampling_points.dat
echo S 0.4c c 0.4 cyan 0.1p,gray31 1c Cold springs >> sampling_points.dat
echo H 14p,3 Others >> sampling_points.dat
echo N 2 >> sampling_points.dat
echo S 0.6c c 0.6 white 1p,black 1.5c City >> sampling_points.dat
echo S 0.6c r 0.6 skyblue 0.6p 1.5c ;River and Lakes >> sampling_points.dat
echo G -1r >> sampling_points.dat
echo G 0.25c >> sampling_points.dat
echo S 0.6c c 0.3 black 0.8p,black 1.5c >>sampling_points.dat
gmt legend sampling_points.dat -DJBL+w9.5c/8c+jBL+o0c/0c+l1.8 -F+p0.7p+g255 -C3p/3p --FONT_ANNOT_PRIMARY=12p,4
|
图内标记(文字及符号)
技巧
1
| echo 96 36.15 Qinghai | gmt text -F+f16p,5,black
|
文件转换
.shp 转 .gmt
1
| ogr2ogr -f "OGR_GMT" *.gmt *.shp
|
gmt读取tiff绘图 .tif 转 .grd
1
| gdal_translate.exe -of GSBG *.tif *.grd
|
dem影像拼接办法
gmt读取tiff绘图 .tif 转 .grd
- 打开ArcGis 10.5,添加解压后的DEM影像数据,检查将要拼接的区域是否完整;
- 在工具栏选择“数据管理工具”——“栅格”——“栅格数据集”——“镶嵌至新栅格”。(英文版本:Data Management Tool——Raster——Raster Dataset——Mosaic To New Raster);
- 在“镶嵌至新栅格”界面上,可从右边文件夹处快速选中输入所要拼接的DEM影像。在“输出位置”中选择将要保存的文件夹;在“具有扩展名的栅格数据集名称”一栏输入拼接后输出的DEM名称;“像素类型”根据DEM影像原始信息选择,右键点击图层名称查看属性;
- 点击确认后,即可完成拼接。
同时欢迎关注我导的微信公众号为有源头热水来 ,里边有更高级的内容值得我好好学习!